How to Tape Your Gymnastics Clubs

The Ultimate Guide

Guide Overview

In this Guide, I am going to show you how to tape an amazing hula hoop design.

I’ll share some design secrets, go over F.I.G. compliance, and share some safety tips.

As a bonus, I’ll teach you how to keep your clubs in tip-top shape.

By the end of this guide, you’ll know exactly how the pros do it!
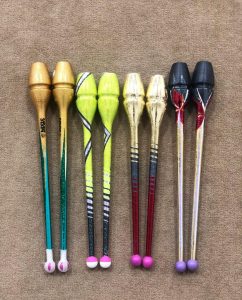
Rhythmic Gymnastics Clubs Designed With Tape

Materials

Invest in quality materials. Going cheap will definitely result in a waste of time and frustration. Plan your colors and design ahead of time.

  • Scissors
  • Rhythmic Gymnastics Clubs
  • Scotch Tape -clear – (less than a ¼ roll)
  • “Colored Tape”
  • Alcohol/ Paper Towels (To Clean Adhesive if Re-Wrapping)
  • Stamp Cuts (Optional to Add Extra Designs)
Materials For Taping Rhythmic Gymnastic Clubs

If you don’t know what size clubs you need to buy, then I recommend you check out this rhythmic gymnastics apparatus guide. You can find some good charts and images that might help you. 

TIP: Is this your first design? Keep it simple! Don’t stress yourself out with a complicated design and too many colors. Remember nobody gets it right their first time. Stay calm and most important, have fun! 🙂

Chapter 1:

How to Tape Your Clubs

Now that we have all our materials on hand, we can start laying the foundation of our design.

Don’t be afraid of making mistakes because that is the best way to learn. 

Step 1 of Designing Rhythmic Gymnastics Clubs is Starting to Tape at the Top

1)Start by adding tape, in strips for the top portion of the rhythmic gymnastics club. Tape one at at time and cut off the ends. Laying them in rows makes it easy to keep your design consistent and neat. Tape rows down all the way around the club.

Using Scissors at the very End of the Clubs for Smooth Edge

TIP: Avoid air bubbles by keeping the tape tight between your hand and the club. Apply the tape from one end and then applying pressure as you lay the rest of it down. If you spot air bubbles its best to use your fingers try to push them out or re-apply.

NOTE: As of November of 2018 F.I.G. related events must use F.I.G. certified products. Make sure to leave a certified mark or label visible.

FIG Logo
Finishing Applying Silver Tape all the Way Around Clubs Apparatus

2)For the part directly below we will cut the tape in half and repeat the same step from above (we cut in half because thinner strips help us to avoid air bubbles on the curved portion). Cut strips and repeat the first step on the part directly below.

Applying Silver Tape on the Middle of the Gymnastics Clubs Apparatus
Applying Silver Tape Evenly in Rows on the Clubs Apparatus

3)After you’ve finished taping horizontally we start wrapping the club sideways to hide the end pieces we’ve just created. Going from left to right, carefully wrap the tape around for a couple of inches.

Applying Silver Tape on the top of the Gymnastics Clubs Apparatus
4)Next, Starting with a new color from the middle of the club, going from left to right we wrap at an angle until the new color meets the silver part.
Taping Green Base Color To our Rhythmic Gymnastics Clubs Apparatus
Applying Green Tape to the Middle of your Clubs Apparatus
Applying Green Tape to the Middle of the Design

5)Quick pro Step- To add a spiral effect. Cut a very thin triangle. Add it to where the silver and green meet.

Cutting Green Holographic Tape into Triangle for Spiral Design
Taping Green Spiral to the Top of the Clubs Apparatus

TIP: Are you having issues with some of the tape staying down on uneven surfaces? Use a thin amount of scotch tape to hold it down.

Adding Tape Around the Round Part of the Clubs to keep Tape Down
6)Add black tape to the bottom of the club until it meets the green.
Cutting Black Tape in Half With Scissors
Taping Black Color on the Bottom of the Clubs
Rhythmic Gymnastics Clubs Apparatus Easy Tape Design with Silver, Green, and Black Colors

Well done!! You’ve taped your first clubs. Check out the bonus steps to help protect your design. If you want to make this design even prettier…. then let’s check out the next chapter.

Chapter 2:

How to add spiral effect to clubs design

In this chapter, I show you how to add a spiral effect to your design. 

Try to use colors that coordinate well with your dress or leotard. 

Don’t be afraid to mismatch effects or spirals, that makes them even more unique. 

Cutting at an Angle to Add Spiral Green Style to Clubs

7)Let’s add a green spiral, that transitions into the black section. I start by cutting a really long triangle (about 1 ft) Then using wider side of the tape apply it on the green and roll it around the club slowly with more and more space in between the green tape.

Taping Green Color Spiral to the Bottom of the Gymnastics Clubs Apparatus
You can add an additional spiral or stamp cuts of shapes if you’d like. I am going to keep it simple.
Simple Rhythmic Gymnastics Clubs Apparatus Design

Chapter 3:

Making Your Gymnastic Clubs Perfect

Be sure to check your design for air bubbles.

See if anything needs to be re-taped.

Our last step it add any finishing touches. 

Checking Gymnastics Clubs For Air Under Tape

8)Here is the same image (for desktop or tablet) a little bigger  of me applying a thin silver piece’s on the top of the club to make it look almost completely covered.

Checking Gymnastics Clubs For Air Under Tape
We are finished with the design portion and are ready to add our clear scotch tape. If you want to further your design you can add even more spirals into the current spirals check our hoop design guide for an example.

Chapter 4:

Protecting Your Clubs Design

Let me tell you from personal experience… it is terrible when you put so much work into your design only to have a small accident ruin it. 

Spend the extra time and follow this step to help your clubs last a little longer.

Plus it makes it look shiny 🙂

Taping Clear Scotch Tape On the Bottom of The Gymnastics Clubs

9)Staring with the bottom of the club, work your way up with the scotch tape, until it meets the uneven surface.

Pushing Air Bubbles of Taped Gymnastic Clubs
Cutting Scotch Tape Off of Rhythmic Gymnastics Clubs Apparatus
10)Start from the lower portion of the head and tape it down until it meets the green area.
Adding Clear Scotch Tape to Rhythmic Gymnastics Clubs Apparatus
Protecting Your Rhythmic Gymnastics Clubs Apparatus with Clear Scotch Tape
11)Next, we work our way from the middle of the head to the top.
Gymnastics Clubs Getting Bubbles Pushed out from Under Tape

Great work!! You’ve designed your first clubs. 🙂

Professional Taped Rhythmic Gymnastics Clubs Silver, Green, and Black Color

Conclusion

That’s it.

You are on your way to becoming an expert. 

If you are willing to go the extra mile, to protect all the time you spent on your design, then we recommend investing into a cover for your clubs. It’s a great way to keep your rhythmic gymnastics equipment safer during competition travels.  

Now it’s your to turn share. What kind of design did you create? Or post some questions to something that was unclear.  

  • No comments yet.
  • Add a comment